Monday, August 10, 2015

Get Free 1 Month Worldwide Unlimited Calls Skype To Phone/Mobile

Skype a famous VoIP calling and chat service, is now offering you FREE Unlimited Calling for an entire month. That means, in addition to making free Skype to Skype calls, you can also call offline contacts on their mobiles and land lines for free.

2

How to get free Worldwide calls for a month :

  • Click here to visit Skype offer page
  • Now click on “Claim your free month“
  • Enter your Personal Details
  • Add you Credit / Debit card Details – You will not be charged for it
  • Login/ Signup to get Get Skype Free 1 Month Unlimited World Subscription


BEFORE YOU LEAVE….

Please Sign-up for our free newsletter to get all new UPDATES directly in your Inbox.

We need your Support & Like for our Facebook Page - Visit here official facebook page for more posts and click LIKE button.

You may also interested in

HOW TO FIND THE MOBILE NUMBER OF ANY SIM CARD

How To Remove Shortcut Virus From Pendrives And Memory Cards

Easily Remove Your Pendrive Virus Without Using Any Antivirus

How To Get Your Forgotten Nokia Phone's Security Master Code Easily?

Thursday, September 25, 2014

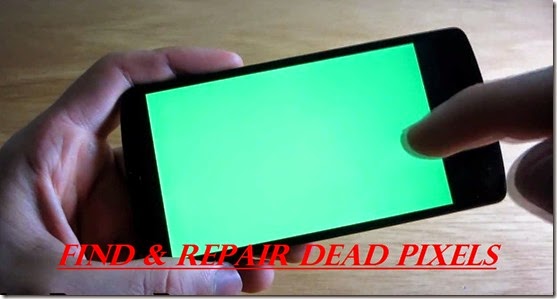
Have You Checked & Repaired Dead Pixel Of Your Android LCD Screen?

maxresdefault

Have You Checked & Repaired Dead Pixel Of  Your Android LCD Screen?

Here is an app called Dead Pixel Detect and Fix, which can detect dead pixels and helps in even repair them.

Features of Dead Pixel Detect and Fix:

Detect any stuck or dead pixel on your LCD screen.

Provide EASY way to fix the stuck pixel.

Also works for screen burn-in.

No more defective pixels on your precious device.

Custom Color and 6 predefined colors to choose from for manual inspection: red, green, blue, white, black, grey.

Recommend to run 6-12 hours "Fix it!!" for reviving stuck pixel.

If you try the FIX function for several times and the issue still exist, please consider exchange your device for new one or contact your mobile service provider.

You can use the "COLOR" to prove there IS or ARE dead pixels on your LCD screen.

Download Dead Pixel Detect and Fix On Your Android Mobile (click here)

Note: We do not take any responsibility and we are not liable for any damage which may rise on using the "FixIt" function. We do not endorse or guarantee any result of the "FixIt" function.

CLICK HERE FOR MORE WINDOWS MOBILE OR LUMIA TIPS AND TRICKS.

CLICK HERE FOR MORE ANDROID TIPS AND TRICKS.

CLICK HERE FOR MORE COMPUTER TRICKS.

Screen Shots:

locator-625x311

BEFORE YOU ARE LEAVING….

Be updated by following us on Google+ and liking our Facebook Page. Or subscribe to our Free News Letter.

You may also interested in

HOW TO FIND THE MOBILE NUMBER OF ANY SIM CARD

How To Remove Shortcut Virus From Pendrives And Memory Cards

Easily Remove Your Pendrive Virus Without Using Any Antivirus

How To Get Your Forgotten Nokia Phone's Security Master Code Easily?


Use Friend's Android To Find Your Lost/Stolen Android Mobile

Google has included some less known functions in Android which might help you get your mobile or tablet back, in case you happen to misplace them or if it gets stolen.This is possible with Android Device Manager. You can lock or erase your device data remotely if it gets stolen. Also, in case you are finding it difficult to locate your phone, you can “ring” your device. Don’t panic! You can lock, erase or even find your Android device by using your friends android mobile.
device_manager_for_android
If you're away from the computer and lose your Android, your first reaction may have been to race home to check the GPS location of your device. With the recent update to the Android Device Manager, you can check the location from a friend's device instead.
You may also interested in


How To Locate Your Lost Or Stolen Android Mobile/Tablet With Gmail?

Here's how to find your device:

Step 1: Open the Android Device Manager app on your friend’s android mobile (or install it if not installed earlier) and tap the username menu at the top. Pick Guest.
adm1
Step 2: Enter your Gmail and normal password that you'd use to log in at Gmail.
Step 3: Choose your device and then pick the necessary action like ring, lock, or erase. Ring action will help you locate it. When you're done, tap Sign out at the top.
adm3 (1)
That's It !!!  With this easy steps find your device when you're away from the computer, with the help of your friends android mobile.

BEFORE YOU ARE LEAVING….

 
Be updated by following us on Google+ and liking our Facebook Page. Or subscribe to our Free News Letter.
You may also interested in

Say Good Bye To Android Mobile Over Heating Problem !!

If you are using your android mobile for playing games or using it for extended periods, you may end up with over heating of your mobile. You may noticed that mobile will get little hot. Today in this post I will tell you how to over come this problem. Here is an app called Coolify, which test your device temperature and helps to reduce the temperature of your mobile.

coolify-teaser

Coolify is an app that can be used to help prevent overheating on your Android devices. By constantly measuring the temperature values of the device, it provides useful information that helps you maintain an optimal internal temperature and also extend the life of your battery.

Coolify help you to cool your rooted devices down when you are not using them or your devices are charging in an original and unique way!

CLICK HERE FOR MORE WINDOWS MOBILE OR LUMIA TIPS AND TRICKS.

CLICK HERE FOR MORE ANDROID TIPS AND TRICKS.

CLICK HERE FOR MORE COMPUTER TRICKS.

Coolify will give you the unique experience:


1. Keep your device Normal temperature
2. One-Click Optimization;
3. Coolify is nearly transparent! Set and forget!
4. The simple user interface and without major uncomfortable impact on user experience;
5. Never need to deal with the complexity and risk;
6. Support Immersive mode

At last, Coolify do need a background persistent cooling service to cool down when you are not actively using them. It is designed and implemented in extremely light-weight. and nearly zero CPU and battery consumption when this service in Background.

DOWNLOAD COOLIFY ON YOUR ANDROID (click here)

Note: To use Coolify on your Android Mobile, Your mobile must be Rooted.

Screen Shots:

coolify-01

coolify-02

BEFORE YOU ARE LEAVING….

Be updated by following us on Google+ and liking our Facebook Page. Or subscribe to our Free News Letter.

You may also interested in

HOW TO FIND THE MOBILE NUMBER OF ANY SIM CARD

How To Remove Shortcut Virus From Pendrives And Memory Cards

Easily Remove Your Pendrive Virus Without Using Any Antivirus

How To Get Your Forgotten Nokia Phone's Security Master Code Easily?

Wednesday, September 24, 2014

How To Increase Speed Of Chrome For Android?

google_Chrome_android

5 EASY STEPS TO INCREASE SPEED OF CHROME FOR ANDROID

1. Giving Chrome Access to more memory:

This one is crucial and easy to do. By typing in the following URL in your browser, Chrome will get access to more RAM, make sure to select 512MB. Here is the url: chrome://flags/#max-tiles-for-interest-area

2. Enabling offline mode:

This will force Chrome to store more information of a particular website in the Cache, allowing you to browse websites you visit frequently with more speed. This can be accomplished by typing the following URL: chrome://flags/#enable-offline-mode

CLICK HERE FOR MORE WINDOWS MOBILE OR LUMIA TIPS AND TRICKS.

CLICK HERE FOR MORE ANDROID TIPS AND TRICKS.

CLICK HERE FOR MORE COMPUTER TRICKS.

3. Make new tabs load faster:

By entering the following URL you can change the new tab window and improve its overall performance by enabling and disabling several features. Here is the URL: chrome://flags/#enable-new-ntp

4. Entering the Advanced Setting mode:

Many small tweaks can be made from the advanced setting mode, we highly suggest you take a look around and disable anything that could be slowing your browser down. Here is the URL: chrome://flags

5. Using the Chrome Beta:

Usually Chrome Beta’s come with huge performance issues and stability improvement, we highly recommend you download a new Chrome Beta whenever it is available. You can download the latest one here

SOURCE: http://www.amongtech.com/

BEFORE YOU LEAVE….

Please Sign-up for our free newsletter to get all new UPDATES directly in your Inbox.

We need your Support & Like for our Facebook Page - Visit here official facebook page for more posts and click LIKE button.

You may also interested in

HOW TO FIND THE MOBILE NUMBER OF ANY SIM CARD

How To Remove Shortcut Virus From Pendrives And Memory Cards

Easily Remove Your Pendrive Virus Without Using Any Antivirus

How To Get Your Forgotten Nokia Phone's Security Master Code Easily?

How To Click Best Selfie With Your Mobile Back Camera?

Smart Selfie is a voice guided photography app that use facial recognition to guide you in how to move or rotate your phone to take the perfect selfie with the back camera. It is one of the best android selfie taking apps in the PlayStore.

1111

Why to use the back camera for selfie?

* You should always treasure your memories, remember to use your best camera for taking photos. With smart selfie you can take perfect selfie every time without any guesswork on where your face is in the photo.
* If your phone lacks front camera then Smart Selfie is perfect for you.
* Why to use a low 0.3 - 1.3mp front camera camera, when you can use 3.2mp+ camera available at back on nearly all phones.

Once you have taken the photo you can share the photo online through popular social networking apps or send the photo to other apps for further enhancements.

FEATURES OF SMART SELFIE:-

1.The best thing with this app is no need of front camera, you can use your high end back camera for taking selfie.

2.Once your camera is in position Smart Selfie takes the photo automatically. There is no need to press any buttons, touch the screen, whistle, set timers, or give voice commands to take a photo.

3.With Smart Selfie you can take selfies of a single person or take selfies with multiple people at once in the same photo.

DOWNLOAD:-

DOWNLOAD SMART SELFIE ON YOUR ANDROID (click here)

How to use (see user guide in app for more detail)

1) Take note if photo is set to Portrait or landscape. Rotate Camera or adjust settings
2) Point back camera at your face, hold the phone about 30cms from your face
3) Follow the voice prompt, Move or angle your phone.
4) Hold the camera still when advised. The photo will be taken automatically.
5) Use the inbuilt gallery to view your photos. Or access them with other apps they are located in your Pictures/Smart Selfie/ folder (optional step)

CLICK HERE FOR MORE WINDOWS MOBILE OR LUMIA TIPS AND TRICKS.

CLICK HERE FOR MORE ANDROID TIPS AND TRICKS.

CLICK HERE FOR MORE COMPUTER TRICKS.

Current detection/useability features:

* Zoom Factor
*Face Balance
* Selfie stick Supported/Camera stand support
* Smart Flash
* Measure
* Eyeliner
* Quick Presets

Note: Please exit Smart Selfie when not in use. It might drain battery when minimized.

Note:- Smart Selfie is still under development if Smart Seflie stops running try restarting your android device. You can also turn on SAFE MODE in smart selfie's camera settings. This may stop your crashes.

SCREEN SHOTS:-

222

333

BEFORE YOU LEAVE….

Please Sign-up for our free newsletter to get all new UPDATES directly in your Inbox.

We need your Support & Like for our Facebook Page - Visit here official facebook page for more posts and click LIKE button.

You may also interested in

HOW TO FIND THE MOBILE NUMBER OF ANY SIM CARD

How To Remove Shortcut Virus From Pendrives And Memory Cards

Easily Remove Your Pendrive Virus Without Using Any Antivirus

How To Get Your Forgotten Nokia Phone's Security Master Code Easily?

Tuesday, September 16, 2014

Disable Keyboard Vibration In Android

Keyboard vibration in Android is a nice to have feature for some people. But you can disable the keyboard vibration in Android easily. Furthermore, disable the keyboard vibration can save your battery and make it last longer!

There are two types of vibrations

1. Vibrations for keyboard presses

2. Vibrations for the bottom soft keys

unnamed

1. Vibrations for keyboard presses

Vibration when typing on the default Google keyboard

To disable vibrations for keyboard presses

1. In Settings, choose Language & input or Language & Keyboard.

2. Touch the preferences button to the right of Google Keyboard.

3. Uncheck Vibrate on keypress OR Vibrate on typing.

CLICK HERE FOR MORE WINDOWS MOBILE OR LUMIA TIPS AND TRICKS.

CLICK HERE FOR MORE ANDROID TIPS AND TRICKS.

CLICK HERE FOR MORE COMPUTER TRICKS.

2. Vibrations for the bottom soft keys

Vibration when pressing the soft (bottom) keys for home, back, task drawer. Here's how to make it go away.

To disable vibrations for the bottom soft keys

1. In Settings, go to Sound.

2. Uncheck Vibrate when ringing (for some models Untick the “Haptic feedback” or “Vibrate Feedback”)

Thats It  !!!

You just disable the keyboard vibration in your Android Phone!

BEFORE YOU LEAVE….

If you think this is useful, help us to share this information to your buddy.

Please Sign-up for our free newsletter to get all new UPDATES directly in your Inbox.

We need your Support – Like & Share our Facebook Page - Visit here official facebookpage for more posts and click LIKE button.

You may also interested in

HOW TO FIND THE MOBILE NUMBER OF ANY SIM CARD

How To Remove Shortcut Virus From Pendrives And Memory Cards

Easily Remove Your Pendrive Virus Without Using Any Antivirus

How To Get Your Forgotten Nokia Phone's Security Master Code Easily?

Sunday, September 14, 2014

Tips & Tricks For Xiaomi's Mi3 & Redmi 1S (MIUI V5 OS)

Bought a Redmi or Mi 3 smartphone recently but not quite sure how to use features? Here in this post I will tell you tips and tricks of Xiaomi mobiles.

1. Switch between Normal Lock Screen and Music Player

The typical home screen of MIUI lets you access the call log (swipe left), camera (swipe up), messages (swipe right) and unlock (swipe down).

xiaomi_miui_lockscreen_1_new

If you want to listen to music without unlocking the phone, double tap on the centre of the circle (orange glow) and it will switch from the typical lock screen to one with music controls.

xiaomi_miui_lockscreen_2_new

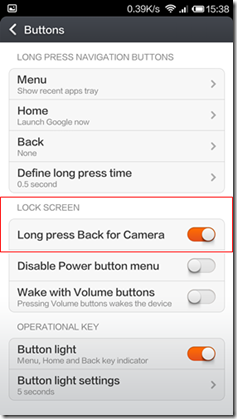
2. Long Press Back Button as Shortcut to Camera

While some smartphones allow you to unlock straight into the camera app via a dedicated shutter button or on the lock screen, MIUI allows you to unlock to the camera app by long pressing the back button on the lock screen.

The option can be enabled in Settings > Buttons > Long Press Back for Camera.

2 xiaomi_miui_backbuttonforcamera

CLICK HERE FOR MORE WINDOWS MOBILE OR LUMIA TIPS AND TRICKS.

CLICK HERE FOR MORE ANDROID TIPS AND TRICKS.

CLICK HERE FOR MORE COMPUTER TRICKS.

3. Long Press Back to Close Current App

Pressing the back button in most Android devices does not close the app; the app simply runs in the background. In MIUI, there is an option for you to close the current app by long pressing the back button.

This will prevent apps from running in the background and consuming resources (battery and data).

3 xiaomi_miui_backtocloseapp

4. Long Press Any Icon in Toggles to Access its Settings

While most, if not all Android devices come with Quick Settings, not all of them support quick access to the individual setting page for the toggle. MIUI lets you long press on any icon in the Toggles to access its setting page.

4 xiaomi_miui_toggles_settings

5. Network Speed

Ever wondered how fast your data connection is? MIUI gives you the option to see the connection speed on the status bar at the top.

This option can be enabled or disabled via Settings > Notifications > Show Connection Speed.

5 xiaomi_miui_dataspeeds_1

6. Mass Deletion of Apps

Do you find deleting of single apps a little troublesome when you are performing some "housekeeping" on your Xiaomi phone? Don't worry as MIUI allows you to delete multiple apps at one go.

Execute a pinch gesture on the home screen to go to "Edit Mode". Tap (not drag) on the apps that you want to uninstall and they will be directed to the bottom of the screen. Once the apps have transitioned to the bottom of the screen, use a pinch gesture to group them together. Drag the entire stack of apps to the top to uninstall them at one go.

6

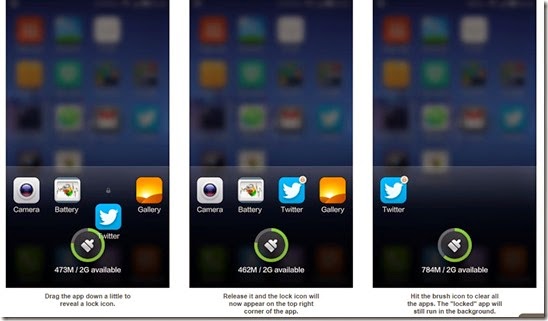
7. Keep Certain App(s) Running While Closing The Rest

Most Android smart phones allow you to close all the apps running in the background via their own task managers, but none allows you to select particular app(s) to continue running while you end all others. MIUI gives you the freedom to decide which apps to continue running in the background while you close the other apps and processes at one go.

7

Source: www.hardwarezone.com.sg

BEFORE YOU LEAVE….

If you think this is useful, help us to share this information to your buddy.

Please Sign-up for our free newsletter to get all new UPDATES directly in your Inbox.

We need your Support – Like & Share our Facebook Page - Visit here official facebookpage for more posts and click LIKE button.

You may also interested in

HOW TO FIND THE MOBILE NUMBER OF ANY SIM CARD

How To Remove Shortcut Virus From Pendrives And Memory Cards

Easily Remove Your Pendrive Virus Without Using Any Antivirus

How To Get Your Forgotten Nokia Phone's Security Master Code Easily?

SIM Card Not Detected On Android Phones – How To Fix?

In this post, we will give you some solution How to Fix The Problem SIM Card not Detect on Android Phones.

Untitled (1)

The following instructions will give you instructions how to fix SIM Card not detect on Android Phones

1.Check if the IMEI is of your mobile

Go to your dial pad and dial *#06#. Once you dial it, the IMEI number should automatically show up.

If that doesn't happen, then there is a problem with your mobile – contact your mobile Service Center.

If you have dual sim mobile, you have to get two separate valid IMEI numbers.

2. If you use Android with dual SIM, turn off the android phone and then remove each SIM Card.

Then try to wipe with soft cloth

Insert SIM Card back to the slot And turn on your mobile.

If it success, fixed your problem with SIM Card, If fail go to next step.

CLICK HERE FOR MORE WINDOWS MOBILE OR LUMIA TIPS AND TRICKS.

CLICK HERE FOR MORE ANDROID TIPS AND TRICKS.

CLICK HERE FOR MORE COMPUTER TRICKS.


3. Turn of Android device

Then remove the SIM Card both SIM Card 1 and SIM Card 2 from the phone

Now insert SIM Card 1 to Slot of SIM Card 2 and also insert SIM Card 2 to slot of SIM Card 1.

Then turn on your android phone power, if detect the SIM Card you are done. If not, go to next step.

4. Take another SIM Card of your carrier(which is in working condition in other mobile)

Insert it in to sim slot of your  Android phones.

If new SIM Card is detected, it means Your old SIM card is broken, if not detected its mean your Android phone in a trouble.

If you can identify your problem here, don’t go to next step, if not try next instruction.

5. Factory Data Reset can be a solution if the above three steps of instruction not able to resolve the problem.

You can Do Factory reset data by going to setting and choose Back Up and reset.

Before doing factory reset, prepare your Android data by back up Android, in order to save your data.

6. This is the last solution to fix problem with Android mobile that can’t detect SIM card.

The last solution is going to Service Center. They able to repair and fix the problem with your phone.

BEFORE YOU LEAVE….

If you think this is useful, help us to share this information to your buddy.

Please Sign-up for our free newsletter to get all new UPDATES directly in your Inbox.

We need your Support – Like & Share our Facebook Page - Visit here official facebookpage for more posts and click LIKE button.

You may also interested in

HOW TO FIND THE MOBILE NUMBER OF ANY SIM CARD

How To Remove Shortcut Virus From Pendrives And Memory Cards

Easily Remove Your Pendrive Virus Without Using Any Antivirus

How To Get Your Forgotten Nokia Phone's Security Master Code Easily?

Wednesday, September 10, 2014

Trick: Increase Internal Memory Of Your Android Mobile

Your android mobile may come with a very low internal storage which has given low memory notification after a few downloads of the applications. If you have this type mobile then it is good news for you. You can increase the internal memory for follow these method.

ANDROID

This method is absolutely free and here you are not increasing internal storage size of your phone, but you can allocate some part of your memory card for your phone to install applications as phones internal memory. Your mobile must be rooted to use this trick.

CLICK HERE FOR MORE WINDOWS MOBILE OR LUMIA TIPS AND TRICKS.

CLICK HERE FOR MORE ANDROID TIPS AND TRICKS.

CLICK HERE FOR MORE COMPUTER TRICKS.

Steps to Increase Internal Memory of your Android mobile:-

  • Download Root Explorer or any other such explorer which can explore root directory of device.
  • Open Root Explorer.
  • Navigate to system/etc folder mount it as rw(read/write).
  • There you will find vold.fstab file, copy it to your sdcard.
  • Then in your PC open the file in an Text Editor.
  • Find the lines like these.

1How-to-Increase-Internal-Memory-of-Android

  • Replace sdcard with ext_card and ext_card with sdcard in these two lines.

2How-to-Increase-Internal-Memory-of-Android1

  • Again navigate to system/etc change the name of the current vold.fstab file to vold.fstab.old (make backup).
  • Paste the new edited vold.fstab file there and long press on it you will get a menu from there change the permissions to “rw_r_ _r_ _” this is important.
  • Reboot the system. Done !

If you dont want to use this trick and want to restore changes, delete the edited vold.fstab file and rename the vold.fstab.old file as vold.fstab and reboot your mobile. Thats It !!

Note: We are not responsible if you mess up with your phone, for bricked phones and dead sd cards. Try this at your own risk.

You may also interested in

HOW TO FIND THE MOBILE NUMBER OF ANY SIM CARD

How To Remove Shortcut Virus From Pendrives And Memory Cards

Easily Remove Your Pendrive Virus Without Using Any Antivirus

How To Get Your Forgotten Nokia Phone's Security Master Code Easily?

BEFORE YOU LEAVE….

Please Sign-up for our free newsletter to get all new UPDATES directly in your Inbox.

We need your Support & Like for our Facebook Page - Visit here official facebook page for more posts and click LIKE button.

Monday, September 8, 2014

How To Bypass Android Mobile Pattern Lock, Password Or Lock Screen Security?

Did you ever forget the password of your android device or messed up with lock screen security. I have very simple method to unlock or reset the android lock pattern.


Method 1:

When you enter wrong pattern or pasword for 5 times then it will give you warning and you try once thirty seconds. But after you forget pattern or password click forget pattern on your mobile screen, then enter gmail id (what you have entered in Google play store) click Ok. Then check your Gmail and reset your mobile lock screen.
But if you don’t know email id then follow below simple methods (method 2 or method 3) to reset or unlock your android mobile.

Method 2:
Note:-By using this method, you lose all your mobile user/personal data.

1 ) First of all, you need to switch off your android device and keep it for some time.
2 ) After switching of your android device, press your mobile volume up ↑ button and hold It.
3 ) Now press the power button and hold it too along with the volume up button.
4 ) It will start a secret terminal interface.
5 ) Then use home button for scroll volume up and down.
6 ) Then choose option Delete All User Data.
7 ) Now in this way, your android lock pattern is unlocked now problem is solved.
Your device will take some time but after it will restart and you will find out your android device has been unlocked. But the bad thing with this trick is you will loose all your personal/user data.
Method 3:
In this method you will reset your lock screen without wiping/losting your user data. Only thing is Your mobile must be ROOTED.
If your device already has a custom recovery installed such as CWM or TWRP then the can easily the pattern lock, password lock or face unlock.
  1. Download the Pattern-Password-Disable.zip file.
  2. Copy the downloaded zip file into an SD card.
  3. Insert the SD card into the device.
  4. Reboot the device into recovery mode.
  5. Select Install Zip from SD Card.
  6. Navigate to the installed zip file and select it to flash.
  7. Reboot.
  8. Finish!
Note:  All This Methods Are For Educational Purposes Only. You Shall Not Use This On Other People Phones Without Permission Under Any Circumstances. We are Not Responsible For Any Eventual Errors And Misbehaving Of Your Devices.

Trick: Use Your Memory Card To Increase Ram Of Android Mobile

In a smart phone, RAM means more multiprocessing power and ability to play high-end applications. So, in this article I will tell you how to convert your SD card into RAM. Increasing ram does not mean that you are internally adding some hardware to your Android phone. We will give you some simple tricks and software that will help you to boost ram of your android smart phone. these method could help you to increase your ram up to 2-4 GB. 


Here We will show you how to convert free space available in your SD card, to increase ram of your android mobile or tablet. You can do this by two methods. Both of them are different. First method requires use of some softwares to increase RAM while other method you need to partition your SD card.

Note: Try any one method, Dont try both at a time.
Note: Your Mobile/Tablet Must Be Rooted To Use This Tricks. You can get the procedure for rooting of your device by just googling.


You may also interested in

Requirements:


1. SD card of class 4 or higher
2. Rooted smartphone Or Rooted Tablet (If you want to increase RAM and Internal Memory of it.)
3. SD card reader
4. Windows PC
5. An internet connection for downloading a few softwares or you can get it from somewhere else also.
METHOD 1:

Check out for ROEHSOFT RAM Expander (SWAP) awesome tool that can convert your memory card free space into your device’s RAM. This is the best application in play store that can efficiently increase your smartphone’s ram.

One thing you should keep in mind before buying this app is to check whether your phone support this app or not. you can check the compatibility of app with your device by using this compatibility app.

If your smart phone support ROEHSOFT RAM Expander (SWAP) than you can buy it.
This app creates no magic it simply increase up your android smartphone RAM by converting a part of SD card memory into RAM. Then your memory card will be used as virtual RAM.


  1. Once you have checked that your device is compatible buy this app from google play store.
  2. After you have installed the app in your smart phone create a swap file.
  3. You can create swap file by clicking swap active and enable it.
  4. Final step it activate swap. You can do so by clicking on grey box.
  5. Done. You have successfully fully increased your RAM.

METHOD 2:

For this method your phone must support swapping. To check this you must download swap check app. If your smartphone support swap function then fallow the below steps.


1.Download Mini tool Partition from Here

2. Install the application on your PC and connect your SD card to your PC with Card Reader.

3. Open Mini Tool Partition in your PC and when the wizards open click on your SD Card and select Delete option. (Note: This will format your SD Card completely mean that it will erase your data permanently, so before doing this backup your data at any place in PC or other Storage device.)

4. When the Formatting of your SD Card is completed then, you have whole of space of your SD Card as unallocated then Right click SD Card and select make Partition option.

5. A popup box will open giving you options for making partition; select the partition as primary and file system as FAT if SD Card is less than 4GB (or FAT32 if your SD Card is more than 4GB).

6. Leave about 1GB or more space (your choice) for making the next partitions.

7. Then select done and do right click on unallocated space of your SD Card and again click make option. Select Primary partition but this time change the file system to Ext2, Ext3 or Ext4 (instead of FAT32 or FAT). Click on apply and within few minutes your partition process is done. Note: (Ext2 is not compulsory as most ROMs work fine with it).

8. Now Install Link2sd from Google Play or download and install the .apk format file from here to your phone.

9. Open the app, it will ask for root permissions, give root access then, it will ask you the file system of the .ext partition that you had made in previous steps, choose the option as you had choose in the partitioning steps. Sort the apps according to size and start linking them.

10. Final step is to download swapper for root.

11. Open the app and select desirable increase in ram size.

12. Once you choose the RAM amount it will create .swp file and increases your device RAM.

Though it’s a long process but still an excellent technique to convert your SD card to increase you smart phone RAM.

NOTE: You are advised to use the given methods at your own risk. Whether you are testing or increasing your android smartphone RAM. No authorities, developers or source site is responsible for any damage caused to your device.

Having problem during conversion, comment below in the comment section.