Wednesday, September 24, 2014

Use Your Smart Phone without Battery - Dual Battery Feature of Samsung

Our smart phones battery dies too fast and that causes problem for us most of the times. To solve this, we generally carry a backup battery. We have to turn off our phone before replacing the discharged battery. We all know the uneasiness that we face while our phone is OFF.

low-battery1

Samsung is coming up with a smart phone that doesn’t get shut down when its battery is removed and thus you can use smart phone without battery.

The smart phone will consist of two batteries; the main battery and the supplementary battery. The main battery recharges the supplementary battery, thus you don’t have to recharge it separately. The supplementary battery will be present inside the smart phone itself and you won’t be able to remove it.

CLICK HERE FOR MORE WINDOWS MOBILE OR LUMIA TIPS AND TRICKS.

CLICK HERE FOR MORE ANDROID TIPS AND TRICKS.

CLICK HERE FOR MORE COMPUTER TRICKS.

HOW IT WORKS?

Samsung is going to place a sensor under the battery cover. Whenever you will remove the battery the cover sensors will get activated and will switch the power supply of your smart phone from main battery to the supplementary battery. Thus your smart phone will keep on working even after removing its battery.

The objective of supplementary battery is not to run the phone same as the main battery. It is supposed to only act as a backup and supply power to only selected parts of the smart phone. After switching the power supply to supplementary battery, the CPU sends phone to sleep mode so that it can retain it state rather than loosing all the data due to abrupt shutdown.

Be updated by following us on Google+ and liking our Facebook Page. Or subscribe to our Free News Letter.

You may also interested in

HOW TO FIND THE MOBILE NUMBER OF ANY SIM CARD

How To Remove Shortcut Virus From Pendrives And Memory Cards

Easily Remove Your Pendrive Virus Without Using Any Antivirus

How To Get Your Forgotten Nokia Phone's Security Master Code Easily?

Wednesday, September 17, 2014

Soon YouTube Videos Available Offline In India

Google plans to make YouTube available offline, allowing people to save on download charges for watching their favorite videos.

In the coming weeks, once the service is available offline, viewers can download the video, save it and watch it later without downloading it again and in turn, save on recurring data download charges.

youtube-m

“YouTube is popular here. You watch some videos again and again. How awesome would it be if you could keep watching them again and again without having to pay for data, and take the videos with you wherever you go?” Google Vice President Product Management Ceasar Sengupta said.

He added that in the next few weeks, YouTube will be available offline in India.

As of now, the service is not available in any other country. “You can download a video once, save it to your phone, and watch it again and again,” he said.

According to industry reports, the online video consumption is pegged at over 3.7 billion videos per month in the country.

CLICK HERE FOR MORE WINDOWS MOBILE OR LUMIA TIPS AND TRICKS.

CLICK HERE FOR MORE ANDROID TIPS AND TRICKS.

CLICK HERE FOR MORE COMPUTER TRICKS.

According to comscore, the total online video audience in India saw growth of over 70 per cent in 2013 with the average viewer watching 18 per cent more videos and spending 28 per cent more time viewing.

Video consumption on mobile phones has also been growing steadily in the country.

YouTube alone gets over 60 million unique users a month and about one-third of the traffic coming from mobile phones.

India is the first country where Google has launched its Android One smartphones, in partnership with handset makers Micromax, Karbonn and Spice. Other countries like Indonesia, Bangladesh and Philippines will follow in the coming months.

Source: indianexpress.com

BEFORE YOU LEAVE….

If you think this is useful, help us to share this information to your buddy.

Please Sign-up for our free newsletter to get all new UPDATES directly in your Inbox.

We need your Support – Like & Share our Facebook Page - Visit here official facebookpage for more posts and click LIKE button.

You may also interested in

HOW TO FIND THE MOBILE NUMBER OF ANY SIM CARD

How To Remove Shortcut Virus From Pendrives And Memory Cards

Easily Remove Your Pendrive Virus Without Using Any Antivirus

How To Get Your Forgotten Nokia Phone's Security Master Code Easily?

Sunday, September 14, 2014

Hurry !!! Get AVG Internet Security 2015 License For Free (1 Day Left)

Features Of AVG Internet Security 2015
Detects and stops viruses, threats and malware

Great easy to use protection everyone needsOur job is to stop viruses before they even get to your PC. We check your files before you open them, your Facebook links before you click, your email before it gets to you and your websites before you visit them.

avg_antivirus_internet_security_2014_serial_numb

You get: AntiVirus, AntiMalware (AVG Resident Shield), AVG Anti-Rootkit, AVG Email Scanner, AVG Protective Cloud Technology, AVG Community Protection Network, AVG LinkScanner® Surf-Shield, AVG Social Networking Protection.

Prevents online spam and scammers

Ultimate protection than reduces the risk of you falling prey to online scamsWe all know who we want to see in our inbox. We keep a look out for those unwelcome visitors who might be phishing or pulling a scam so you can focus on the visitors you do want to see.

Leaves no trace of your deleted files

Permanently delete your most sensitive informationHitting the delete button doesn’t always give you that complete peace of mind. Using File Shredder will.

You get: File Shredder

Helps keep your private files safe
Encrypt and store your files for added privacyHaving that extra level of security to keep your private information away from prying eyes gives you that added peace of mind.

HOW TO GET THE LICENCE?

Click here Get AVG Internet Security 2015 License – THEN FALLOW THEBELOW STEPS

avg free

CLICK HERE FOR MORE WINDOWS MOBILE OR LUMIA TIPS AND TRICKS.

CLICK HERE FOR MORE ANDROID TIPS AND TRICKS.

CLICK HERE FOR MORE COMPUTER TRICKS.

  • Click On Download
  • Create New Account with your email ID

avg 22

  • Then Download Your AVG Internet Security Setup File And License Key File

avg33

Thats It!!!

BEFORE YOU LEAVE….

Please Sign-up for our free newsletter to get all new UPDATES directly in your Inbox.

We need your Support – Like & Share our Facebook Page - Visit here official facebookpage for more posts and click LIKE button.

You may also interested in

HOW TO FIND THE MOBILE NUMBER OF ANY SIM CARD

How To Remove Shortcut Virus From Pendrives And Memory Cards

Easily Remove Your Pendrive Virus Without Using Any Antivirus

How To Get Your Forgotten Nokia Phone's Security Master Code Easily?

Wednesday, September 10, 2014

Convert Any Hard Copy Into Soft Copy Using Google Drive

Many times you have to face this situation that you need the matter which you have in hard copy in soft copy. Like any lesson, notes or some official papers that you have in hard copy but you want them in soft copy so that you can use them through system. What you do if you face this problem? Will you type all those papers to get them in soft copy? In this article we will show you the way by that you can convert your hard copy matter in soft copy with the use of Google Drive OCR. Google Drive provides a quick and easy way to turn image and PDF files into editable text for free.

google-instant-previews

What Is Google OCR?

Optical Character Recognition (OCR) lets you convert images with text into text documents using automated computer algorithms. Images can be processed individually (.jpg, .png, and .gif files) or in multi-page PDF documents (.pdf).

These are some of the types of files suitable you can give as input

  • Image or PDF files obtained using flatbed scanners
  • Photos taken with digital cameras or mobile phones
Using OCR in Google Drive

In Google Drive, your uploaded images or PDF files, scan the file, and use computer algorithms to convert the file into a Google document.

For best results, the image or PDF files need to meet certain requirements:

  • Resolution: High-resolution files work best. As a rule of thumb, we recommend each line of text in the documents to be of at least 10 pixels height.
  • Orientation: Only documents with horizontal left-to-right text are recognized. If you've accidentally scanned or captured a document in a different orientation, please use a program to retouch and edit images to rotate them before uploading to Google Drive.
  • Languages, fonts and character sets: Our OCR engine supports a number of character sets, but support for non-Latin character sets is still experimental. You can select the language of your document from a drop-down menu. You'll get better results if your file includes common fonts such as Arial and Times New Roman.
  • Image quality: Sharp images with even lighting and clear contrasts will work best. Motion blur or bad camera focus will decrease the quality of the detected text.
File size limitations

The maximum size for images (.jpg, .gif, .png) and PDF files (.pdf) is 10 MB. For PDF files, we only look at the first 10 pages when searching for text to extract.

OCR can take longer than other uploads into Google Drive. Image files (.jpg, .gif, .png) can take up to 30 seconds and PDF files (.pdf) can take up to a minute.

CLICK HERE FOR MORE WINDOWS MOBILE OR LUMIA TIPS AND TRICKS.

CLICK HERE FOR MORE ANDROID TIPS AND TRICKS.

CLICK HERE FOR MORE COMPUTER TRICKS.

Steps to use Google OCR:

To add your documents to Google Drive to get them OCRed, go in to your Google Drive account. On the My Drive page, click the Settings button on the right side of the page. Under Upload Settings, check off the Convert text from uploaded PDF and image files and the Confirm settings before each upload options.

computers-tutsplus-gdocr-settings

Make sure the proper settings are enabled before proceeding to upload the document.

Then, click the Upload button next to Create button on the left side of the page. Select Files, and find the file that you want to convert to text in Finder. Click Open.

computers-tutsplus-GDOCR-upload

An Upload Settings panel will appear. Select the proper language from theDocument language drop-down menu, and leave the Confirm settings before each upload box checked.

computers-tutsplus-gdocr-confirmsettings

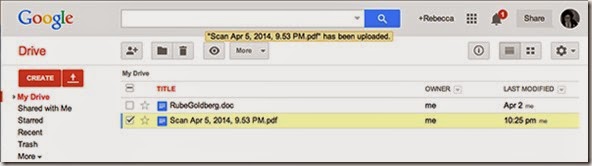
Click Start upload once you have confirmed your settings. Upload progress can be monitored in the bottom right corner of the page. Uploads typically last around 30 seconds for image files and up to a minute for multipage PDFs.

computers-tutsplus-gdocr-uploaded

You may also interested in

HOW TO FIND THE MOBILE NUMBER OF ANY SIM CARD

How To Remove Shortcut Virus From Pendrives And Memory Cards

Easily Remove Your Pendrive Virus Without Using Any Antivirus

How To Get Your Forgotten Nokia Phone's Security Master Code Easily?

Once the upload is complete, a new Google Doc appears in the drive, titled the same as the name of the original file. Open the new document, and rename it if need be. The original file is displayed on the top of the document, and the text extracted from the document is displayed directly below.

computers-tutsplus-gdocr-completed

Google's OCR technology does its best to retain the original formatting of the scanned document; however, some of it may be lost in the translation process. Luckily, changes can easily be made due to the fact that the text is editable.

OCR document may be exported as an editable text document, such as a Word Document or a Plain Text document, by going to File > Download As and selecting the format you want.

computers-tutsplus-gdocr-sharing

If you have any trouble OCRing your documents in Google Drive, Please comment below.

BEFORE YOU LEAVE….

Please Sign-up for our free newsletter to get all new UPDATES directly in your Inbox.

We need your Support & Like for our Facebook Page - Visit here official facebook page for more posts and click LIKE button.

Trick: Increase Internal Memory Of Your Android Mobile

Your android mobile may come with a very low internal storage which has given low memory notification after a few downloads of the applications. If you have this type mobile then it is good news for you. You can increase the internal memory for follow these method.

ANDROID

This method is absolutely free and here you are not increasing internal storage size of your phone, but you can allocate some part of your memory card for your phone to install applications as phones internal memory. Your mobile must be rooted to use this trick.

CLICK HERE FOR MORE WINDOWS MOBILE OR LUMIA TIPS AND TRICKS.

CLICK HERE FOR MORE ANDROID TIPS AND TRICKS.

CLICK HERE FOR MORE COMPUTER TRICKS.

Steps to Increase Internal Memory of your Android mobile:-

  • Download Root Explorer or any other such explorer which can explore root directory of device.
  • Open Root Explorer.
  • Navigate to system/etc folder mount it as rw(read/write).
  • There you will find vold.fstab file, copy it to your sdcard.
  • Then in your PC open the file in an Text Editor.
  • Find the lines like these.

1How-to-Increase-Internal-Memory-of-Android

  • Replace sdcard with ext_card and ext_card with sdcard in these two lines.

2How-to-Increase-Internal-Memory-of-Android1

  • Again navigate to system/etc change the name of the current vold.fstab file to vold.fstab.old (make backup).
  • Paste the new edited vold.fstab file there and long press on it you will get a menu from there change the permissions to “rw_r_ _r_ _” this is important.
  • Reboot the system. Done !

If you dont want to use this trick and want to restore changes, delete the edited vold.fstab file and rename the vold.fstab.old file as vold.fstab and reboot your mobile. Thats It !!

Note: We are not responsible if you mess up with your phone, for bricked phones and dead sd cards. Try this at your own risk.

You may also interested in

HOW TO FIND THE MOBILE NUMBER OF ANY SIM CARD

How To Remove Shortcut Virus From Pendrives And Memory Cards

Easily Remove Your Pendrive Virus Without Using Any Antivirus

How To Get Your Forgotten Nokia Phone's Security Master Code Easily?

BEFORE YOU LEAVE….

Please Sign-up for our free newsletter to get all new UPDATES directly in your Inbox.

We need your Support & Like for our Facebook Page - Visit here official facebook page for more posts and click LIKE button.

Monday, September 8, 2014

Trick: Use Your Memory Card To Increase Ram Of Android Mobile

In a smart phone, RAM means more multiprocessing power and ability to play high-end applications. So, in this article I will tell you how to convert your SD card into RAM. Increasing ram does not mean that you are internally adding some hardware to your Android phone. We will give you some simple tricks and software that will help you to boost ram of your android smart phone. these method could help you to increase your ram up to 2-4 GB. 


Here We will show you how to convert free space available in your SD card, to increase ram of your android mobile or tablet. You can do this by two methods. Both of them are different. First method requires use of some softwares to increase RAM while other method you need to partition your SD card.

Note: Try any one method, Dont try both at a time.
Note: Your Mobile/Tablet Must Be Rooted To Use This Tricks. You can get the procedure for rooting of your device by just googling.


You may also interested in

Requirements:


1. SD card of class 4 or higher
2. Rooted smartphone Or Rooted Tablet (If you want to increase RAM and Internal Memory of it.)
3. SD card reader
4. Windows PC
5. An internet connection for downloading a few softwares or you can get it from somewhere else also.
METHOD 1:

Check out for ROEHSOFT RAM Expander (SWAP) awesome tool that can convert your memory card free space into your device’s RAM. This is the best application in play store that can efficiently increase your smartphone’s ram.

One thing you should keep in mind before buying this app is to check whether your phone support this app or not. you can check the compatibility of app with your device by using this compatibility app.

If your smart phone support ROEHSOFT RAM Expander (SWAP) than you can buy it.
This app creates no magic it simply increase up your android smartphone RAM by converting a part of SD card memory into RAM. Then your memory card will be used as virtual RAM.


  1. Once you have checked that your device is compatible buy this app from google play store.
  2. After you have installed the app in your smart phone create a swap file.
  3. You can create swap file by clicking swap active and enable it.
  4. Final step it activate swap. You can do so by clicking on grey box.
  5. Done. You have successfully fully increased your RAM.

METHOD 2:

For this method your phone must support swapping. To check this you must download swap check app. If your smartphone support swap function then fallow the below steps.


1.Download Mini tool Partition from Here

2. Install the application on your PC and connect your SD card to your PC with Card Reader.

3. Open Mini Tool Partition in your PC and when the wizards open click on your SD Card and select Delete option. (Note: This will format your SD Card completely mean that it will erase your data permanently, so before doing this backup your data at any place in PC or other Storage device.)

4. When the Formatting of your SD Card is completed then, you have whole of space of your SD Card as unallocated then Right click SD Card and select make Partition option.

5. A popup box will open giving you options for making partition; select the partition as primary and file system as FAT if SD Card is less than 4GB (or FAT32 if your SD Card is more than 4GB).

6. Leave about 1GB or more space (your choice) for making the next partitions.

7. Then select done and do right click on unallocated space of your SD Card and again click make option. Select Primary partition but this time change the file system to Ext2, Ext3 or Ext4 (instead of FAT32 or FAT). Click on apply and within few minutes your partition process is done. Note: (Ext2 is not compulsory as most ROMs work fine with it).

8. Now Install Link2sd from Google Play or download and install the .apk format file from here to your phone.

9. Open the app, it will ask for root permissions, give root access then, it will ask you the file system of the .ext partition that you had made in previous steps, choose the option as you had choose in the partitioning steps. Sort the apps according to size and start linking them.

10. Final step is to download swapper for root.

11. Open the app and select desirable increase in ram size.

12. Once you choose the RAM amount it will create .swp file and increases your device RAM.

Though it’s a long process but still an excellent technique to convert your SD card to increase you smart phone RAM.

NOTE: You are advised to use the given methods at your own risk. Whether you are testing or increasing your android smartphone RAM. No authorities, developers or source site is responsible for any damage caused to your device.

Having problem during conversion, comment below in the comment section.

Trick: How To Compress 1 GB File Into 10 MB?

Do you know you can really compress a 1 GB file into a 10 MB file?  There are instances when your memory card, USB flash drives or hard drives run out of memory. We find difficult to share data or files due to shortage of storage memory. It becomes difficult to upload a 1 GB file on internet. But, you do not need to worry about these problems from now. Here is a software called KGB Archiver which enables you to compress a file at an extent from 1 GB to 10 MB.

Softwares like WinRar. WinRar can compress a file by 10% maximum. But by KGB Archiver, you can successfully compress a file by 90% efficiency rate.


Features Of KGB Archiver

  • It is 100% free and easy to use.
  • No crack, patch or serial key is required to activate it.
  • It can compress at a rate of 90% efficiency.
  • It can make a password protected compressed file.
  • It has the ability of self-extracting archives.
  • It is compatible with many extensions. One of them is .zip.
  • The Unicode is supported in both file systems as well as in User interface.
  • It is in many languages like English, Chinese, Russian, etc.

Steps to Compress 1 GB file into 10 MB:

  • At first, Download the software KGB Archiver from the below links.
OR

  • After downloading the setup files, install it in your PC.
  • Choose the option of Compress files and then click NEXT.
  • Select the archive format as “KGB“. For better experience, choose maximum compression level from the default setting of Normal .
  • Then, select the files to be compressed by clicking on “Add file” button.
  • After selecting the files, click on NEXT. The file compression will start.It will take some time depending on the actual size of the file. Wait for the completion and then you are done.
NOTE: There is only one drawback. If you choose “maximum compression level” in the third step, then it will take longer time as it will compress it at slower rate for better quality.

For decompressing the file, Use the same software to obtain the original file. But make sure that you have enough space for it in the destination directory.

Tuesday, September 2, 2014

Google Reaches Samsung To Offer Free Internet Data For Women In Tamil Nadu

Months after it was first launched, Google is taking its HWGO (Helping Women Get Online) initiative further by getting  Koreant tech major Samsung to facilitate internet access for women. As part of the partnership, Samsung will offer six months of data free to every woman who purchases a low-cost Samsung device in Tamil Nadu. The offer will soon be extended to Nagpur.

11

CLICK HERE FOR MORE WINDOWS MOBILE OR LUMIA TIPS AND TRICKS.

CLICK HERE FOR MORE ANDROID TIPS AND TRICKS.

CLICK HERE FOR MORE COMPUTER TRICKS.

What Is HWGO?

HWGO- Helping Women Get Online

For the first time anywhere in the world,Google has started an initiative to get more women online.

“Internet ke liye koi madat chahiye toh hum hai na…”

That is a pretty strange welcoming statement for any helpline. But then this is not any helpline. This is the first helpline set up to help women go online. One that starts at the very basics,asking if you know how to switch on a computer. The HWGO campaign has been running for a few months

To know more about HWGO – Click Here

CLICK HERE FOR MORE WINDOWS MOBILE OR LUMIA TIPS AND TRICKS.

CLICK HERE FOR MORE ANDROID TIPS AND TRICKS.

CLICK HERE FOR MORE COMPUTER TRICKS.

Google associate Women Weavers’ organisation has meanwhile launched Internet carts with web-enabled devices and collaterals offering information on how to use internet to rural parts of Madhya Pradesh where women find it difficult to travel for training sessions.

The hwgo website, available in Hindi, English, Tamil and Marathi, has also played its part by trying to be a gateway to the Internet for first-time woman users by providing learning modules and curated content.

BEFORE YOU LEAVE….

Please Sign-up for our free newsletter to get all new UPDATES directly in your Inbox.

We need your Support & Like for our Facebook Page - Visit here official facebook page for more posts and click LIKE button.

You may also interested in

HOW TO FIND THE MOBILE NUMBER OF ANY SIM CARD

How To Remove Shortcut Virus From Pendrives And Memory Cards

Easily Remove Your Pendrive Virus Without Using Any Antivirus

How To Get Your Forgotten Nokia Phone's Security Master Code Easily?

Source: indianexpress.com

How to Make Your Windows Laptop Battery Last Longer?

Budget notebook PCs, and even some of the more expensive ones, have one problem in common: battery life. So how do you keep your machine running on a single charge? Here are a few tips and tricks you probably aren’t using:

No other part of your laptop draws as much power as the display.
battery_booster_-_increase_your_battery_life-571753

1) Manually change your screen’s brightness

The number one cause of your battery drain is your screen. No other part of your laptop draws as much power as the display, and automated solutions—in my experience—don’t work well to balance this situation. The better option is to consciously change your screen’s brightness.

The Easy Way: Once you unplug your charger, immediately reduce your screen’s brightness and keep going low till everything is still legible. As long as you can see it, that’s the point to take it to.

The Hard Way: You might not want to reduce your brightness immediately because of whatever you are using the laptop for. So what do you do then? I use a formula where I divide the battery’s level by two, and set the brightness at that. As the battery reduces, I reduce the brightness—again, going as low as possible till a point where I can still see the screen. The advantage of this method is that if you think you’re going to get to a plug point soon enough, then you don’t end up having a substandard screen experience from the start.

CLICK HERE FOR MORE WINDOWS MOBILE OR LUMIA TIPS AND TRICKS.

CLICK HERE FOR MORE ANDROID TIPS AND TRICKS.

CLICK HERE FOR MORE COMPUTER TRICKS.

2) Change The Power Options

Go to Start > Power Options and see which plan you are using. Chances are, it’s the “Balanced” scheme. If you are running low on battery, it’s better to go with the Power Saver option so your computer doesn’t waste any of its limited juice.

If you want to do a task that requires horsepower, then by all means, switch to “High Performance” mode. Just remember to switch back to Power Saver when you’re done. The easiest way to switch is from your System Tray, where the battery indicator is. Click the battery icon and you’ll get options to switch plans.

3) Create Your Own Power Plan And Hibernate

Power Options also lets you create a power plan that you can customize how you see fit. In that, choose to turn off the display in 5 minutes of idle time, and put the computer to sleep after 10 minutes. But a better idea is to skip sleeping altogether and tell the PC to hibernate.

In Hibernate mode, your PC is as good as shut down, but it starts up quickly (because your last setting is saved). Sleep mode still keeps the machine running and thus consumes a little battery. Plus, things like Windows Update or antivirus scans often wake your PC out of sleep mode to run, so it’s not the best way to save battery if you aren’t going to be around.

To switch on Hibernate, you need to click “Change advanced power settings” within your power plan, and then expand the “Sleep” option to see an entry for Hibernate. In that, set the time to 11 minutes, so that after your PC goes into sleep mode, it will start hibernating soon after.

4) “If You Aren’t Using It, Disable It”

The general rule to keep in mind is, “If you aren’t using it, disable it.” So don’t keep a USB drive plugged in if it isn’t needed. Those siphon your laptop’s battery to work, so disconnect it. If you aren’t using your Bluetooth, disable it. If there is an Ethernet cable available, use that over Wi-Fi. Simple things, but when you add them up, you’ll save a lot of battery life.

5) Don’t Panic and Just Use Common Sense

A low battery warning can set off a red alert in your head and panic seeps in. Relax. By now, you are used to changing the settings on their phone to conserve battery. The same things apply to laptops. You know that when there isn’t a Wi-Fi network, you switch your Wi-Fi off; do the same with your laptop. Just like you reduce the smartphone screen’s brightness yourself and disable auto-brightness, do it on your notebook PC too. Phones have told you what matters and what doesn’t when it comes to battery life, so use the same logic here and you’ll be fine.

BEFORE YOU LEAVE….

Please Sign-up for our free newsletter to get all new UPDATES directly in your Inbox.

We need your Support & Like for our Facebook Page - Visit here official facebook page for more posts and click LIKE button.

You may also interested in

HOW TO FIND THE MOBILE NUMBER OF ANY SIM CARD

How To Remove Shortcut Virus From Pendrives And Memory Cards

Easily Remove Your Pendrive Virus Without Using Any Antivirus

How To Get Your Forgotten Nokia Phone's Security Master Code Easily?

SOURCE : http://indianexpress.com/