Saturday, October 29, 2011

How To Change Java Applications, Games Resolution On Your Nokia Mobile?

In my previous post you have seen Emergency Calls From Your Mobile.In this post I will discuss about How To Change Java Applications, Games Resolution On Your Nokia Mobile?

Have you ever come across the problems with screen resolution on your mobile? Like when you tried to install a Java game or application and finds that the resolution is too small or too big for your phone. If you have problems like this, then you are just like me. Sometimes, I have to squint my eyes just to play the game as it is too small on my phone or its too big. So here is the solution for the above problems.

How-to-Resize-Screen-Resolution-in-Java-Games-2

You can actually change the resolution of the Java Games for the Nokia phones very easily.

You should be using WinRAR for this. You can download an evaluation copy of WinRAR from http://www.win-rar.com.
Using WinRAR, open the Java file. The Java file has a file extension .jar.

There should be a folder called META-INF. Open that folder.
Inside that folder, there is a file called MANIFEST.MF. Drag and drop the MANIFEST.MF to your Desktop

Open it using Notepad and at the end of the file, add the following two lines to the MANIFEST.MF file.

Nokia-MIDlet-Original-Display-Size: 176,208
Nokia-MIDlet-Target-Display-Size: 352,416

Now save the file. The drag the file back to the .jar file folder META-INF using WinRAR.

Install the JAR file to your phone.

NOTE: For your mobile what is the xxx,xxx (176, 208 and 352.416) in the Nokia-MIDlet-Original-Display-Size & Nokia-MIDlet-Target-Display-Size? It is the screen resolution.

E.g.
Nokia-MIDlet-Original-Display-Size: 176,208
Nokia-MIDlet-Target-Display-Size: 352,416

The above shows that the original game resolution is 176×208 and the new target resolution is 352×416 i.e. for N80. The Original Display Size is the actual resolution of the game. The Target Display Size is the resolution you want the game to be displayed at on your phone, for example 352 ,416 is the resolution of the Nokia N80. For Nokia 3110c 128,160 is the Target-Display-Size.Please be aware that the resolution of a game can be resized larger but not smaller.

CLICK HERE TO SEE SOME USEFUL MOBILE APPLICATIONS.

Sign-up for our free newsletter to get all new articles directly in your Inbox.

Free Adobe Photoshop Express For Android

In my previous post you have seen  How To Find Caller’s Location In Android Phones?.In this post I will discuss about Free Adobe Photoshop Express For Android phones.

Adobe Photoshop Express, the award-winning photo editing and sharing application for Android mobiles. It offers you to make fun mobile photography, edit and share photos virtually anywhere. Just touch to crop, rotate, adjust color, and add artistic effects. Also Access all your photos and videos directly from your free Photoshop.com account. Quickly share with family and friends.

clip_image001

Features of Adobe Photoshop Express:

1.Edit Creativity:

Fix photos fast — crop, straighten, rotate, flip, and adjust color.

Make eye-catching enhancements with filters and effects.

Add borders to give photos a polished look.

clip_image002

2. Share Quickly:

Email your photos to family and friends.

Post photos to Photoshop.com, Facebook, and Twitpic with one tap.

You may also like FREE AVG MOBILATION PRO FOR ANDROID–A FREE ANTI VIRUS, Get Free Paid Games and Applications for Apple iPhone, iPod and iPad devices and Android, How To Find Caller’s Location In Android Phones?.

clip_image002[1]

3. Back up Easily:

Upload and store mobile photos to your free Photoshop.com account.

clip_image003     clip_image004

For Free Download and Install Adobe Photoshop Express for Android Phone Click Here.

Sign-up for our free newsletter to get all new articles directly in your Inbox.


Friday, October 28, 2011

Emergency Calls From Your Mobile

Emergency Calls From Your Mobile
Many countries have a single emergency telephone number, sometimes known as the emergency services number. This allows a caller to contact local emergency services like Police, Fire, medical for assistance.
VBKN14-EMERGENCY_CAL_12335e
The emergency telephone number may differ from country to country. It is typically a three-digit number so that it can be easily remembered and dialed quickly.
For example:
Country      AMBULANCE     FIRE         POLICE
Australia         112                   112                112
India              102                    101                100
US                  911                   911                 911
CLICK HERE TO KNOW YOUR COUNTRY EMERGENCY NUMBERS.
Once a call is made to an emergency telephone number, it must be answered.
If you find yourself out of coverage area of your mobile network and there is an emergency, dial emergency number and the mobile will search any existing network(if your home network is not there) to establish the emergency number for you.Most GSM mobile phones can dial emergency calls even when the phone keyboard is locked, the phone is without a SIM card..
Most GSM mobile phones have 112, 999 and 911 as pre-programmed emergency numbers that are always available.Most GSM phones accept a larger list of emergency numbers without SIM card, such as 112, 911, 118, 119, 000, 110, 08, and 999. Try on our mobile these codes when keypad is locked.
Mobile phones generate additional problems for emergency operators, as many phones will allow emergency numbers to be dialed even while the keypad is locked. Since mobile phones are typically carried in pockets and small bags, the keys can easily be depressed accidentally, leading to unintended calls. A system has been developed to connect calls where the caller is sent to an automated system, leaving more operators free to handle genuine emergency calls.
EMERGENCY NUMBERS FOR INDIA
For police: 100 or 2611
For Medical: 102,1298,108,112,2611
For Fire: 101 or 2611
Chennai Traffic Police – 103.
Delhi Traffic Police – 1095.
Kolkata Traffic Police – 1073.
Bangalore uses both 108 and 100.
There is no national emergency number, but 108 is used in many states.
Note: For Example, 100 is the emergency number for INDIA. But sometimes a person from India may not access this 100 number, when a mobile(like Nokia,Sony etc.) keypad is locked. Because Nokia mobiles are not manufactured in India. If you take VIDEOCON Mobile, which is Indian manufacturer, you can dial 100 even though your VIDEOCON Mobile keypad was locked. But for all mobiles (Nokia, Sony, Videocon etc.) 112, 911, 118, 119, 000, 110, 08, and 999 will work with keypad lock also.
CLICK HERE TO SEE SOME USEFUL MOBILE APPLICATIONS.
Sign-up for our free newsletter to get all new articles directly in your Inbox.
If you know any other tricks please post a comment to let others know.

Thursday, October 27, 2011

China Mobile Secret Codes

In my previous post you have seen  LG Mobile Secret Codes.In this post I will discuss about China Mobile Secret Codes. Below codes work on most china mobiles.

With the help of these codes, you can get hidden information of handsets and troubleshoot the routine problems. These codes may change setting of your mobile , hence be careful while you use it.

China Mobile

Here is the list of Secret Codes:

*#66*# Set Factory Mode CONFIRMED

*#8375# Show Software Version CONFIRMED

*#1234# A2DP ACP Mode CONFIRMED

*#1234# A2DP INT Mode CONFIRMED

*#0000#  and press ‘Send’ : Set Default Language CONFIRMED

*#0007# and press Send : Set Language to Russian CONFIRMED

*#0033# and press Send : Set Language to French CONFIRMED

*#0034# and press ‘Send’ : Set Language to Spanish CONFIRMED

*#0039# and press ‘Send’ : Set Language to Italian CONFIRMED

*#0044# and press ‘Send’ : Set Language to English CONFIRMED

*#0049# + Send : Set Language to German CONFIRMED

*#0066# and press ‘Send’ : Set Language to Thai CONFIRMED

*#0084# and press ‘Send’ : Set Language to Vietnamese CONFIRMED

*#0966# and press ‘Send’ : Set Language to Arabic CONFIRMED

default user code: 1122, 3344, 1234, 5678

Engineer mode: *#110*01#

Factory mode: *#987#

Enable COM port: *#110*01# -> Device -> Set UART -> PS Config -> UART1/115200

Restore factory settings: *#987*99#

LCD contrast: *#369#

software version: *#800#

software version: *#900#

set default language: *#0000# Send

set English language: *#0044# Send

set English language (new firmware): *#001# Send

Hope all these secret codes are useful to you.if you know any other tricks please post a comment to let others know.

NOTE: Not all of these codes will work for your particular phone. Try these codes at your own risk!

CLICK HERE TO SEE SOME USEFUL MOBILE APPLICATIONS.

Sign-up for our free newsletter to get all new articles directly in your Inbox.

LG Mobile Secret Codes

In my previous post you have seen  Samsung Mobile Secret Codes. In this post I will discuss about LG Mobile Secret Codes. LG mobiles are some what different from other mobile phones, they don't have the same secret codes for all mobile phones, but below codes work on most LG cell phones.

lg-arena-km900-phone

With the help of these codes, you can get hidden information of LG handsets and troubleshoot the routine problems.

Here is the list of LG Secret Codes:

LG all models test mode: Type 2945#*# on the main screen.
2945*#01*# Secret menu for LG
IMEI (FOR ALL PHONES): *#06#
IMEI and SW (LG 510): *#07#
Software version (LG B1200): *8375#
Recount cheksum (LG B1200): *6861#
Factory test (B1200): #PWR 668
Sim-lock menu (LG B1200): 1945#*5101#
Sim-lock menu (LG 510W, 5200): 2945#*5101#
Sim-lock menu (LG 7020, 7010): 2945#*70001#
Sim-lock menu (LG 500, 600): 2947#*


LG-U81XX SPECIAL CODES
Code to read phone version :
- Phone without SIM
- Enter 277634#*# or 47328545454#
- Select 'SW Version info'


Code to reset phone :
- Phone without SIM
- Enter 277634#*# or 47328545454#
- Select 'Factory Reset'


Code to enter UNLOCK MENU :
- Phone wit SIM inside
- Enter 2945#*88110#


Test Menu 8330 : 637664#*#
Test Menu 8180 V10a: 49857465454#
Test Menu 8180 V11a: 492662464663#
Test Menu 8130-8138: 47328545454#
Test Menu 8110-8120: 277634#*#

Hope all these LG secret codes are useful to you.if you know any other tricks please post a comment to let others know.

NOTE: Not all of these codes will work for your particular phone. Try these codes at your own risk!

CLICK HERE TO SEE SOME USEFUL MOBILE APPLICATIONS.

Sign-up for our free newsletter to get all new articles directly in your Inbox.

Wednesday, October 26, 2011

How To Test Your Samsung Mobile Hardware?

In my previous post you have seen  Samsung Mobile Secret Codes. In this post I will discuss How To Test Your Samsung Mobile Hardware?
If you want to test your phone to make sure every sensor, every color, every device in it is working correctly, then you are at right place…It’s easy. This will work for Samsung Infuse, Galaxy mobiles and more also for all Samsung Android based mobiles.
Samsung Galaxy S2-1
Fallow the steps below:
Step 1) Press your phone icon like you’re about to make a call.
Step 2) On the keypad press *#0*#
Now you should see a white screen that says LCD Test. The coolest test is the sensor test. Have fun!!

Here Is The Video Tutorial For Samsung Galaxy S2 I9100 Or Android Based Mobiles - Secret Phone Code For LCD Test


If you know any other tricks please post a comment to let others know.
CLICK HERE TO SEE SOME USEFUL MOBILE APPLICATIONS.
Sign-up for our free newsletter to get all new articles directly in your Inbox.

Samsung Mobile Secret Codes

In my previous post you have seen  How To Set Gmail Settings In Samsung Corby GT-S3650?. In this post I will discuss about Samsung Mobile Secret Codes.

samsung-corby-s3650-2

Here is the list of Samsung Secret Codes:

Find Samsung’s MAC Address
Step 1 ) Go to the phone’s dialpad like you’re about to call someone.
Step 2 ) Press *#2222
#
Step 3 ) Press Menu key
Step 4 ) Press WiFi

You may also interested in How To Set Manual GPRS Settings In SAMSUNG Mobiles?

Find IMEI
Step 1 ) Go to the phone’s dial-pad like you’re about to call someone.
Step 2 ) Press *#06
#

Go to the phone’s dial-pad and press….

*#232337# Find Bluetooth MAC Address

More Codes:

Software version: *#9999#
IMEI number: *#06
#
Serial number: *#0001
#
Battery status- Memory capacity : *#9998*246
#
Debug screen: *#9998*324
# – *#8999*324#
LCD kontrast: *#9998*523
#
Vibration test: *#9998*842
# – *#8999*842#
Alarm beeper – Ringtone test : *#9998*289
# – *#8999*289#
Smiley: *#9125
#
Software version: *#0837
#
Display contrast: *#0523
# – *#8999*523#
Battery info: *#0228
# or *#8999*228#
Display storage capacity: *#8999*636
#
Display SIM card information: *#8999*778
#
Show date and alarm clock: *#8999*782
#
The display during warning: *#8999*786
#
Samsung hardware version: *#8999*837
#
Show network information: *#8999*638
#
Display received channel number and received intensity: *#8999*9266
#

*#1111# S/W Version
*#1234
# Firmware Version
*#2222
# H/W Version
*#8999*8376263
# All Versions Together
*#8999*8378
# Test Menu
*#4777*8665
# GPSR Tool
*#8999*523
# LCD Brightness
*#8999*377
# Error LOG Menu
*#8999*327
# EEP Menu
*#8999*667
# Debug Mode
*#92782
# Phone Model (Wap)
#*5737425
# JAVA Mode
*#2255
# Call List
*#232337
# Bluetooth MAC Address
*#5282837
# Java Version

Type in *#0000# on a Samsung A300 to reset the language
Master reset(unlock) #*7337
# (for the new samsung E700 x600 but not E710)
Samsung E700 type *#2255
# to show secret call log (not tested)
Samsung A300, A800 phone unlock enter this *2767*637
#
Samsung V200, S100, S300 phone unlock : *2767*782257378
#

#*4773# Incremental Redundancy
#*7785
# Reset wakeup & RTK timer cariables/variables
#*7200
# Tone Generator Mute
#*3888
# BLUETOOTH Test mode
#*7828
# Task screen
#*#8377466
# S/W Version & H/W Version
#*2562
# Restarts Phone
#*2565
# No Blocking? General Defense.
#*3353
# General Defense, Code Erased.
#*3837
# Phone Hangs on White screen.
#*3849
# Restarts Phone
#*7337
# Restarts Phone (Resets Wap Settings)
#*2886
# AutoAnswer ON/OFF
#*7288
# GPRS Detached/Attached
#*7287
# GPRS Attached
#*7666
# White Screen
#*7693
# Sleep Deactivate/Activate
#*2286
# Databattery
#*2527
# GPRS switching set to (Class 4, 8, 9, 10)
#*2679
# Copycat feature Activa/Deactivate
#*3940
# External looptest 9600 bps
#*4263
# Handsfree mode Activate/Deactivate
#*2558
# Time ON
#*3941
# External looptest 115200 bps
#*5176
# L1 Sleep
#*7462
# SIM Phase
#*7983
# Voltage/Freq
#*7986
# Voltage
#*8466
# Old Time
#*2255
# Call Failed
#*5376
# DELETE ALL SMS!!!!
#*6837
# Official Software Version: (0003000016000702)
#*2337
# Permanent Registration Beep
#*2474
# Charging Duration
#*2834
# Audio Path (Handsfree)
#*3270
# DCS Support Activate/Deactivate
#*3282
# Data Activate/Deactivate
#*3476
# EGSM Activate/Deactivate
#*3676
# FORMAT FLASH VOLUME!!!
#*4760
# GSM Activate/Deactivate
#*4864
# White Screen
#*7326
# Accessory
#*7683
# Sleep variable
#*3797
# Blinks 3D030300 in RED
#*7372
# Resetting the time to DPB variables
#*3273
# EGPRS multislot (Class 4, 8, 9, 10)
#*7722
# RLC bitmap compression Activate/Deactivate
#*2351
# Blinks 1347E201 in RED
#*2775
# Switch to 2 inner speaker
#*7878
# FirstStartup (0=NO, 1=YES)
#*3838
# Blinks 3D030300 in RED
#*2077
# GPRS Switch
#*2027
# GPRS Switch
#*0227
# GPRS Switch
#*0277
# GPRS Switch
#*22671
# AMR REC START
#*22672
# Stop AMR REC (File name: /a/multimedia/sounds/voice list/ENGMODE.amr)
#*22673
# Pause REC
#*22674
# Resume REC
#*22675
# AMR Playback
#*22676
# AMR Stop Play
#*22677
# Pause Play
#*22678
# Resume Play
#*77261
# PCM Rec Req
#*77262
# Stop PCM Rec
#*77263
# PCM Playback
#*77264
# PCM Stop Play
#*22679
# AMR Get Time
*#8999*364
# Watchdog ON/OFF
*#8999*427
# WATCHDOG signal route setup
*2767*3855
# = Full Reset (Caution every stored data will be deleted.)
*2767*2878
# = Custom Reset
*2767*927
# = Wap Reset
*2767*226372
# = Camera Reset (deletes photos)
*2767*688
# Reset Mobile TV
#7263867
# = RAM Dump (On or Off)
*2767*49927
# = Germany WAP Settings
*2767*44927
# = UK WAP Settings
*2767*31927
# = Netherlands WAP Settings
*2767*420927
# = Czech WAP Settings
*2767*43927
# = Austria WAP Settings
*2767*39927
# = Italy WAP Settings
*2767*33927
# = France WAP Settings
*2767*351927
# = Portugal WAP Settings
*2767*34927
# = Spain WAP Settings
*2767*46927
# = Sweden WAP Settings
*2767*380927
# = Ukraine WAP Settings
*2767*7927
# = Russia WAP Settings
*2767*30927
# = GREECE WAP Settings
*2767*73738927
# = WAP Settings Reset
*2767*49667
# = Germany MMS Settings
*2767*44667
# = UK MMS Settings
*2767*31667
# = Netherlands MMS Settings
*2767*420667
# = Czech MMS Settings
*2767*43667
# = Austria MMS Settings
*2767*39667
# = Italy MMS Settings
*2767*33667
# = France MMS Settings
*2767*351667
# = Portugal MMS Settings
*2767*34667
# = Spain MMS Settings
*2767*46667
# = Sweden MMS Settings
*2767*380667
# = Ukraine MMS Settings
*2767*7667
#. = Russia MMS Settings
*2767*30667
# = GREECE MMS Settings

*#7465625# = Check the phone lock status
*7465625*638*Code
# = Enables Network lock
#7465625*638*Code
# = Disables Network lock
*7465625*782*Code
# = Enables Subset lock
#7465625*782*Code
# = Disables Subset lock
*7465625*77*Code
# = Enables SP lock
#7465625*77*Code
# = Disables SP lock
*7465625*27*Code
# = Enables CP lock
#7465625*27*Code
# = Disables CP lock
*7465625*746*Code
# = Enables SIM lock
#7465625*746*Code
# = Disables SIM lock
*7465625*228
# = Activa lock ON
#7465625*228
# = Activa lock OFF
*7465625*28638
# = Auto Network lock ON
#7465625*28638
# = Auto Network lock OFF
*7465625*28782
# = Auto subset lock ON
#7465625*28782
# = Auto subset lock OFF
*7465625*2877
# = Auto SP lock ON
#7465625*2877
# = Auto SP lock OFF
*7465625*2827
# = Auto CP lock ON
#7465625*2827
# = Auto CP lock OFF
*7465625*28746
# = Auto SIM lock ON
#7465625*28746
# = Auto SIM lock OFF

Hope all these samsung secret codes are useful to you.if you know any other tricks please post a comment to let others know.

NOTE: Not all of these codes will work for your particular phone.

CLICK HERE TO SEE SOME USEFUL MOBILE APPLICATIONS.

Sign-up for our free newsletter to get all new articles directly in your Inbox.

Tuesday, October 25, 2011

How To Use Your Java Mobile As A Compass?

Use your cell phone as a compass. It is used to identify the direction in any place. Thought compass is not useful in day to day life sometimes we find it useful while on adventurous trips, forest camps etc. In such cases, we may find it difficult to locate the path if we don’t have a compass. It is useful for all industries just like army, air force, dth industry. Just download the application and by rotating the phone so that the sun and/or moon icons match their location in the sky, the top of the phone will indicate true north.

compass

Compass For Java Enabled Mobiles

Compass for J2ME works on all mobile phones with Java support. Good news about this application is that it does not require any GPRS connection to work which makes it a really mobile application even if you are out of network.

Download the application Compass for J2ME from here.

Compatibility

Any cell phone or other mobile device with J2ME (Java 2 mobile edition). If your mobile is java enabled, then you are done.

This tool is totally based on scientific / astronomical calculations and shows accurate directions based on the location, date, time, position of sun / moon. Only problem with this application is during afternoon hours, as you cannot properly point out to the direction of sun.

Let us see how to configure and get the exact NS (North – South) directions with this mobile compass tool.

1. Location: If you know the exact airport code of  your nearest airport, you may use that. You may also enter the latitude / longitude. If you are not clear on that, a random placement of location by moving your arrows will work as the time zone is usually one per country.

Get your nearest airport code from here.

2. Time Zone: After you enter the location, you will be asked with time zones based on location. This should be entered correctly as you know the right one.

Compass mobile settings

You may later enter the name to save the location.

Time and date will be automatically extracted from your mobile phone date, time settings.

Next, goto More > Options > Here you get a number of options which you need to set. Take care to note what you have set for "screen top points" – as you are expected to be in a remote place, it should be sun / moon.

compass mobile options

After all the setting is done, your screen will be redrawn. Now, hold your mobile as you had set previously in screen faces and screen top points – you will find a correct North and South direction with most accuracy. Try it at a familiar place to get set to use this tiny useful application.

For example: Your Entered Info
airport code : bombay
timezone : GMT + 5.30
screen facing : sky

Then compass does not move, but we have to move our phone screen accordingly. Say “phone screen top points sun” in settings, then we should hold our phone so that the top of screen points sun and if we observe the screen, it points to north direction. It might be quite tough during some parts of day like afternoon etc.

CLICK HERE TO SEE SOME MORE USEFUL MOBILE APPLICATIONS.

Sign-up for our free newsletter to get all new articles directly in your Inbox.

HAVE ANY PROBLEM, FEEL FREE, PLEASE MAKE YOUR COMMENT BELOW.


How To Set Gmail Settings In Samsung Corby GT-S3650?

This is a guest post written by Anuja Shiran. In this post you will get info about Gmail Settings of Samsung Corby mobile.

Here are the Gmail setting to Samsung GT-S3650. I tried browsing the web but its hard to find the RIGHT information.Please tell me if it doesn’t work.

Samsung-Corby-S3650

Account name: Any name you want e.g.- G-mail
My address: Your email address
Password: Your email password

SAVE

SMTP server: smtp.gmail.com
SMTP port: 465
Secure connection: SSL

Incoming Server type; POP3
POP3 server: pop.gmail.com
POP3 port: 995
APOP login: NO (Don't tick)
Secure connection: SSL
Download limit: 500
Retrieving option: SUBJECT ONLY
Keep on server: YES (Tick)
User Name: Your user name (without the @gmail.com part)
Password: Your email password
Use POP before SMTP authentication: NO (Don't tick)
SMTP auth: YES (Tick)
Same as POP3/IMAP4: YES (Tick)

SAVE!!

That’s it…. HAPPY EMAILING…

Sign-up for our free newsletter to get all new articles directly in your Inbox.

HAVE ANY PROBLEM, FEEL FREE, PLEASE MAKE YOUR COMMENT BELOW.


Monday, October 24, 2011

How To Find Caller’s Location In Android Phones?


In my previous post you have seen How To Test Your Sony Ericsson Mobile Hardware Components?. In this post I will discuss How To Find Caller’s Location In Android Phones?

Whenever you get a call, your phone displays only the caller id but it will be useful if it displays some extra information like Caller Location, Operator? Is it possible? Yes, If you have a android phone then you can easily find the callers location from their phone number. Whenever you get outgoing or incoming calls you can know the caller's location instantly on your screen and the network operator he is using.If you are still confused see the image below for better clarification.

You may also interested in FREE AVG MOBILATION PRO FOR ANDROID–A FREE ANTI VIRUS.

mobile_number

For this you need a application named Shaplus on your Android mobile, it is free application which displays the caller's location and operator.

For landline calls, state and city is shown and for mobile calls, state and operator is shown. For International calls, calling country is shown. In main screen, you can look-up any mobile number, Indian STD code or ISD code(add 00 prefix for ISD code lookup). Position of alert can be set in settings.

It includes detailed call log for missed calls, outgoing calls and incoming call showing Indian state (city also for landline) for Indian numbers and country for international numbers. Option to directly call the entries in the call log.

Mobile Cellular operators identified :
Airtel
Bsnl
Aircel
Videocon
Etisalat Db (Formerly Swan Telecom)/Allianz Infratech
Idea
Loop Telecom  / Bpl Mobile
Mtnl (Dolphin)
S. Tel Limited
Reliance Telecom Pvt. Ltd./Reliance Communications
Idea (Formerly Spice Communications)
Tata Teleservices (Docomo/Tata Indicom/Virgin Mobile)
Uninor - Unitech Wireless
Vodafone (Hutch)
Mts - Sistema Shyam Teleservices

Mobile regions identified :
Andhra Pradesh
Assam
Bihar & Jharkhand
Chennai
Delhi
Gujrat
Himachal Pradesh
Haryana
Jammu & Kashmir
Kerala
Karnataka
Kolkata
Maharashtra
Madhya Pradesh & Chhattisgarh
Mumbai
North East
Orissa
Punjab
Rajasthan
Tamilnadu
Uttar Pradesh(East)
Uttar Pradesh(West) & Uttarakhand
West Bengal & Andaman Nikobar

Click here to download Shaplus  application. 

Screen Shots:

mobile_number       ss-480-1-4     ss-480-2-5

Note: Works only on Android phones and Indian numbers only- And Operator of mobile number will be accurate only for mobile numbers not ported using Mobile number portability(MNP). i.e. This will not work for mobile numbers that have recently undergone operator change under the Mobile Number Portability (MNP) scheme.

Sign-up for our free newsletter to get all new articles directly in your Inbox.

HAVE ANY PROBLEM, FEEL FREE, PLEASE MAKE YOUR COMMENT BELOW.


Saturday, October 15, 2011

How to Test Your Sony Ericsson Mobile Hardware Components ?

In my previous article you have seen Sony Ericsson Secret Codes, In this post I will tell you How to test your Sony Ericsson Mobile.

You may also interested in How To Set Manual GPRS Settings In Sony Ericsson Mobiles?

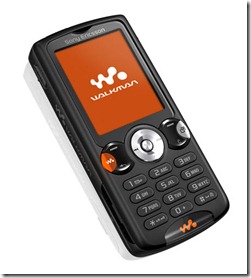
sony-ericsson-w810

Just like any electronic products, mobile phones also sometimes behave in an inappropriate way. Here we shall deal with how to test different services / components of a Sony Ericsson mobile phone. This testing is especially very useful, when you are going to buy a second hand mobile. With this, One can check mobile hardware performance during service with easy steps.

With this, you will be able to test different hardware components like

  1. Main Display,
  2. LED / Illumination,
  3. Keypad / Keyboard,
  4. Speaker, Earphone,
  5. Microphone,
  6. Vibrator,
  7. Camera,
  8. Flash LED,
  9. Memory Stick,
  10. FM Radio etc.

This works for most of the handsets.

There is one secret menu in the Sony Ericsson phone which most of the users are not aware of. It can be accessed with a serial key press in a specific manner (secret code).

Here is the code:

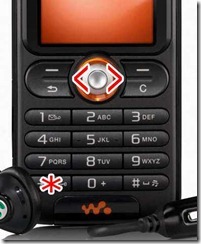
Press  > * < <  * < *

( > means press joystick, arrow keys or jogdial [ A jog dial or jog wheel is a type of knob, ring, wheel, or dial which allows the user to shuttle or jog through audio or video media etc. ] to the right and < means left.)

This will open a menu with a large variety of options based on your model of phone. You'll see phone model, software info, IMEI, configuration info, sim lock status, REAL time clock, total call time and text labels.

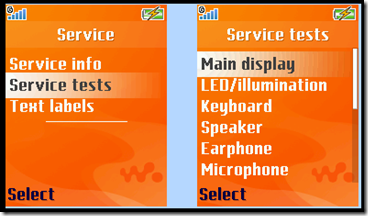
You can also test your phones services and hardware from this menu (main display, camera, LED/illumination, Flash LED, keyboard, earphone, speaker, microphone, radio and vibrator tests)

If you cannot follow the above symbols, please have a look at the following picture and you will understand.

sony-ericsson-keypad

GUIDE LINES:

Once you press this key sequence, you will be presented with a menu which has options like Service Info, Service Tests and Text Labels. Select Service Tests. That’s it, Now you are up with the menu to test different components of your phone. Different components are tested different way and you will not find it difficult to carry over the process.

sony-ericsson-testing

CLICK HERE TO SEE SOME USEFUL MOBILE APPLICATIONS.

Sign-up for our free newsletter to get all new articles directly in your Inbox.

WHEATHER THIS POST IS USEFUL TO YOU OR NOT? FEEL FREE, PLEASE MAKE YOUR COMMENT BELOW.